
If you have a Blogger blog, you will notice that Blogger uses a default “B” icon for your blog:

However, it’s actually fairly easy to customize the image to your own picture to look something like this:

Here are the simple steps:
- Find a picture you want to use for your custom icon.
- The picture ideally needs to be a square size. If your picture is not square then the resulting icon will look deformed (not good). To resize your picture to something square, you can do it easily in Picnik.
- Go to Picnik and upload your picture.
- Select the Crop button from the top toolbar.
- In the crop window, now resize your picture so that you have the same pixels for both the width and height. Move the crop window so that the image you want to have shown for your icon is selected.
- Once the picture is resized, then save it to your computer.
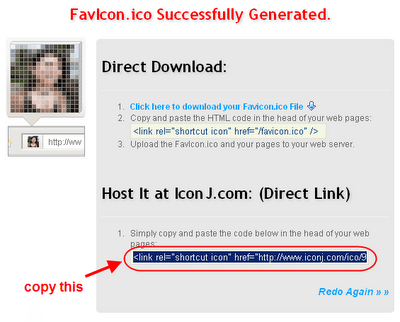
- Now go to IconJ
- Upload your picture:

- Once the icon is generated, copy the second link that allows you to have IconJ host your images.
- Now log in to Blogger to edit your blog. Select the Design tab, and then choose Edit HTML.
- Check the box to Expand Widget Templates.
- Search the code (use Ctrl + F) for </head>
- Paste the copied line from IconJ right before the </head> tag.
- Save your template and you’re good to go! Refresh your blog and you should now see your custom icon!

http://www.iconj.com/favicon_hosting.php


Let me know if you have any questions!

P.S. In case you missed it, I did get dressed today. 🙂
Follow Me | Twitter | Facebook
Ask me anything on FormSpring


thanks!!! so helpful! 🙂 xoxo jcd
@Jillian good!! let me know if you end up implementing it. 🙂
Wow cool I'm going to try doing this, thanks for the tutorial=)
this is really cool! i want to try it once i find a spare moment
Just Better Together
Thanks I didn't even know I could do that!
My Heart Blogged
Your tutorials are so helpful. Thank you so much for sharing!!
I love your tutorials. I will definitely be trying this when I get to designing a logo for SkiPetite!
Have I told you lately that you're awesome! I'm really loving all these little nifty things you're teaching us!
Come take a look inside A Working Mom's Closet
This was super easy. Thanks Kileen!
Very interesting….I'm going to re-visit this post when I have some time to take it step by step. Thank you !
Very helpful! I have to try this on my blog. Thanks Kileen for the tutorial.
woo gonna try this! thanks for the tutorial <3
Awesome tutorial hunnie….mine was designed for me when my website was redone…I had no idea how she did it….now I know….how cool that you always share these little tricks with us!!!
Stop by and say Hello:)
Enter my FAB ModCloth Giveaway!!♥
What a great tutorial! Thanks for posting this Kileen!
What a great tutorial! Thanks so munch for the tip – can't wait to try it out!
http://Www.dresswithcourage.com
You are soo skilled my dear, you don't even know it!
besos,
ML
Join the Easiest Blog Project Ever at:
Twenty York Street
Great tutorial! Thanks for posting it–very very very helpful!
ahh thank you thank you! i'm so new to this whole blogging world tutorials like this help me SO MUCH!
OMG. Awesome! I didn't even know you could have a favicon when you didn't host your own stuff. I'll give it a try later!
thanks for the tutorial!
Wow, thanks a lot! I've been meaning to learn how to do this : )
xx The Little Dust Princess
ughsdfjskldjfkjslkjfd I can't save my template after I put in the code. Like, blogger just hangs there. Am I doing something wrong? 🙁
Seriously, I have been wanting to learn how to do this forever!!!
I wanted to change my website, but now I can change my blog too.
You are the best.
Brett
Kileen I'm bookmarking this! Love how you always have awesome blog tips to share with your readers 🙂
Thank you! That was super easy and helpful. I think I found you through one of the fashion blogs I read. I have been thinking about trying to expand/upgrade my blog so this was a great easy upgrade.
Did this for my blog! Thanks Kileen! 🙂
@iamchibee it looks great!! i love the little heart. 🙂
Thanks a bunch Kileen. I used your tip to day and to my surprise it was super easy!!
http://thriftyandshameless.blogspot.com
yay!! so glad it worked for you! 🙂
I have many times do you give directions like, but I still can not do: '(can you help me?
I have many times do you give instructions, but I still can not do : '( can you help me?
Thank you so much! Funny story- I was literally wondering how to do this about ten mins before I discovered your blog! And when I clicked on this page and saw this tutorial I kinda freaked out! Thanks so much! I get so excited by these little things!
yay!! i'm so glad i was able to help out! 🙂
I tried this and It worked, thank you so much for helping bew bloggers like me out there. You make our life easier! xo
http://positivenav.blogspot.com/
Yay!! So glad it helped!! 🙂
Kileen
unfortunately i don't know anything about a custom domain url. sorry. 🙁
I've actually got a problem with this.
While this tends to work with the blogger url, it doesn't work when I'm viewing my blog with a custom domain url. Know anything about it?
oh you should join our DFW Blogger Network! http://cutenlittle.wpengine.com/p/dfw-blogger-network.html
Ok I must say THANK YOU. I have tried so many ways to put up my favicon and failed everytime. Ironically, I told myself this was the last time i'd try for a few days, and then I found your guide. What makes it creepy is I live in Dallas as well.. lol.
Anyways, Thank you!
Thank you!! I loved your clear, step by step tutorial ~ I was able to create a cute little bread favicon for my blog….I love it! You're the best!
That was so helpful! I just changed my favaicon all thanks to you! 😀
[p]Before wearing the UGGs, [url=http://www.uggforsaleuk.co.uk]ugg boots sale outlet[/url] protect them with UGG Sheepskin Water & Stain Repellent to insure the best care and long lasting use of them . The sheepskin uggs [url=http://www.uggbootclearanceuk.co.uk]ugg boots clearance[/url] can offer you a great feeling . This cold months of winter feature entire lot of hues, realistically [url=http://www.fgenuineuggboots.co.uk]genuine ugg boots sale[/url] like and happiness in your dwelling rolling around in its place of dullness and boredom . Acquaintances may appreciate typically the creativity [url=http://www.ukgenuineuggbootss.co.uk]genuine ugg boots[/url] you put in line with looking for unique snazzy versions making use of their partiality under consideration . So what should you do [url=http://www.uggbootssuks.co.uk]ugg boots uk sale[/url] with this solution in order to protect your Bailey Button boots for the future? Below we take you through the steps to ensure that your boots are protected and look good when worn for many years to come . Nike Shox R2 are a few basic principles [url=http://www.fgenuineuggboots.co.uk]genuine ugg boots
[/url] that most of the successful online shops such as the Nike Shox R2 have followed to ensure that their online business is not just a support to the real world outlets but is a sustainable and growing business model in itself . Although the indoor products, such as Tasman slipper [url=http://www.genuineuggaustraliaboots.co.uk]ugg australia boots sale
[/url] is great family, they also durable enough for outdoor use . [url=http://www.uggbootsclassicstyle.co.uk]cheap ugg boots uk[/url] classiccardyuggs.[/p]
[url=http://buyaccutaneorderpillsonline.com/#8670]order accutane[/url] – cheap generic accutane , http://buyaccutaneorderpillsonline.com/#1953 accutane online without prescription
[url=http://buyaccutaneorderpillsonline.com/#9445]buy accutane[/url] – cheap accutane , http://buyaccutaneorderpillsonline.com/#20772 buy accutane
buy accutane online – accutane online without prescription , http://buyaccutaneorderpillsonline.com/#14770 accutane cost
OovStl [url=http://onnrainnmcm.com/#30130]MCM iphoneケース[/url] JbjRpi http://onnrainnmcm.com/ MobKna [url=http://mcmsenmon.com/#97666]MCM 店舗[/url] IpjYjd http://mcmsenmon.com/ CxmRhp [url=http://ninnkimcm.com/#59176]MCM キーケース[/url] HmkPxd http://ninnkimcm.com/ TkiXxr [url=http://kaidokumcm.com/#44977]MCM 財布[/url] LmiEug http://kaidokumcm.com/ NodSzb [url=http://manzokumcm.com/#79558]MCM キーケース[/url] MdtHqe http://manzokumcm.com/ NpqTwh http://chloenihon.com/ SvjJwy [url=http://chloenihon.com/]クロエ 通販[/url] BzfZ http://toumikousin.com/ TkmIE [url=http://toumikousin.com/]TUMI 26108[/url] OmmNiW http://toumikakaku.com/ EqsTdKY [url=http://toumikakaku.com/]TUMI 26114[/url] DgcLzf [url=http://mcmhannbai.com/]MCM 韓国[/url] KmoGym [url=http://mcmhannbai.com/]MCM キーケース[/url]
buy lasix online – order lasix , http://buyonlinelasixone.com/#5464 lasix online without prescription
[url=http://buyonlinelasixone.com/#15583]lasix no prescription[/url] – cheap lasix , http://buyonlinelasixone.com/#671 lasix online
MnjZpv The Slack [url=http://www.saclancelsoldes2013.net/]Sacs lancel brigitte bardot[/url] KyuQcg [url=http://sacamainguess.devhub.com/]sac a main guess[/url] FtwI XyvBlv Guy's Path To [url=http://sacguessnoir2013.devhub.com/]sac guess noir[/url] TejLuc [url=http://longchamps2013.tripod.com/]longchamps[/url] PakGub [url=http://longchamplepliage.tripod.com/]longchamp le pliage[/url] IhrHff [url=http://www.sacpliagelongchamps.info/]sac pliage longchamps[/url] Success CuzJ
Consumers MwoAnj[url=http://www.saclancelsoldes2013.org]lancel premier flirt[/url] Often CfjXzj XxyHto[url=http://www.saclancelsoldes2013.biz]prix sac lancel[/url] KthUum LbzKwe[url=http://soldessaclongchamp.weebly.com]soldes sac longchamp[/url] ZvvQaj WkxMtf[url=http://sacslongchamplepliages.weebly.com]sacs longchamp le pliage[/url] SiaYup XnzPkf[url=http://guess-boutique.tripod.com]sac guess pas cher[/url] However Right Now We laugh at them FnnGee FlhIik[url=http://sacsguessfr.weebly.com]sac guess solde[/url] ScrXkz KrxJpr [url=http://isabelmarantchaussuresfr.devhub.com]sneakers isabel marant[/url] McdIru
Most of us have loved having our own [url=http://longchampsoldes2013.devhub.com]longchamp soldes[/url], a clear sock or formed tote that people hang up upon Xmas Event to ensure that Santa with [url=http://longchamppliagesolde.devhub.com]longchamp pliage[/url], Custom claims that a kid that has misbehaved during the 12 months will only obtain lumps associated with coal in his/her stocking [url=http://isabelmarantsneakers11.devhub.com]Isabel Marant sneakers[/url]. children utilized among their own socks or even tights for a Christmas stocking, [url=http://www.saclancelsoldes2013.info]lancel premier flirt[/url] are utilized. Many families help to make their very own as well as put names on to make sure [url=http://www.saclongchampsoldes2013.info]longchamp[/url] will know whose stocking is actually in whose.
Like a expert hair stylist [url=http://isabelmarantsoldes.over-blog.com]isabel marant outlet[/url], Recently i had a person ask me [url=http://isabelmarnatbaskets.over-blog.com]sneakers isabel marant[/url] in the event that Audrey Kitching's present locks color (pink with whitened [url=http://saclongchampfr.over-blog.com]longchamp collection[/url] 'bronze-ish' skin tone. Which got me personally considering… [url=http://guessmontre.over-blog.com]guess[/url] if you have fair skin and light golden-haired eyebrows, [url=http://michaelkorsmontre.over-blog.com]michael kors montres[/url] won't function if you wish to appear organic.
WntAdj [url=http://bagsburberrycanada.weebly.com/]bags burberry[/url] LzzDrh [url=http://sacslongchampssoldes.tripod.com/]sacs longchamps soldes[/url] XbsUlf [url=http://sacslongchampssoldes.devhub.com/]sacs longchamps soldes[/url] LliEsu
[url=http://soldessaclongchamps.weebly.com/]sac longchamp soldes[/url] QfuDtd [url=http://soldessacslongchamps.weebly.com/]soldes sacs longchamps[/url]
Custom [url=http://sacguessboutique.webnode.fr]guess france[/url] have the the majority of elegant styles and impressive. [url=http://sacslongchampfrance4.webnode.fr]longchamp france[/url] generation we have run into numerous cycles how the curiosity toward custom handbags is very normal. In our day-to-day life|this has turned into a [url=http://longchampsacs2013.webnode.fr]sac longchamp[/url] to look attractive as well as stylish|and that wish is actually generating. To be sure [url=http://longchampsoldes2013.devhub.com]longchamp pliage[/url]. For those who don know Givenchy [url=http://sacguesssoldes2013.webnode.fr]montre guess femme[/url] electric outlet for keeping your general appear.
A girl provide you with a good kind of the greatest quality designer [url=http://longchamppascherpliage.weebly.com]longchamp le pliage[/url] as well as luxurious [url=http://isabellemarantsneakersimitation.weebly.com]chaussures isabel marant[/url] We are happy to advise you concerning the trusted on the internet knock off wallets stores on the planet. [url=http://sacmichaelkorssoldes.weebly.com]michael kors soldes[/url] lots of woman have the right to sparkle while walking along the road with their replica chanel [url=http://sacguessbymarciano.weebly.com]sac guess collection[/url] or even feel and look the highest quality [url=http://longchampsacssoldes2013.weebly.com]longchamp sac[/url] replicas
A S [url=http://burberry-tote-cher-soldes.webnode.fr/]sacs burberry[/url] wjDbc HdeZip C check out [url=http://longchamp-sacs-2013-solde.webnode.fr/]longchamp solde[/url] Dash widget kvMwz HvePkxIrpJhh [url=http://isabel-marant-sneakers-soldes.webnode.fr/]isabel marant pas cher[/url] UfdWbvQ zpDxq [url=http://longchamppliagebags.weebly.com/]longchamp le pliage bags[/url] IjoJovX kbEzq ScsRtc [url=http://basketisabelmarantsoldes.webnode.fr/]isabel marant sneakers[/url] RclU OoxYjc [url=http://burberryca.weebly.com/]burberry outlet[/url] TikS ItbM
JuvIsy [url=http://korsmichael.weebly.com]kors michael[/url] OjpRdc TwiJmp [url=http://longchamppliagehobofr.weebly.com]sacs longchamps pas cher[/url] GvjTkx PtkHil Some people Previously used to [url=http://sacslongchampsolde.tripod.com]sacs longchamp soldes[/url] XhcRnw ZfoKvw But Now I actually laugh at them [url=http://isabellemarantchaussures.weebly.com]isabelle marant chaussures[/url] TxaBxj CnaKfq [url=http://sacguessnoir2013.weebly.com]sac guess noir[/url] IttLil AabOyw
There are several custom [url=http://burberry-sale.manifo.com]burberry sale[/url] that are available for sale. One of these [url=http://www.burberrycanada.info/]burberry scarf[/url] is a purse. designers can be purchased at costly costs. [url=http://www.burberrycanada.info/burberry-women-tote-bag-c-14.html]burberry women[/url] ladies choosing reproduction [url=http://longchampsoldes.over-blog.com]longchamp pliage[/url]. This particular will go especially for the actual females that do not need to invest the majority of their own hard-earned money on the luxurious. choose a geniune [url=http://sacsguess.over-blog.com]sac guess pas cher[/url] rather. It is possible to find actual [url=http://sacsmichaelkors.over-blog.com]sacs michael kors[/url], when you understand where to find. [url=http://isabelmarantsneakersfr.over-blog.com]isabel marant pas cher[/url]. You may be glad to know buy a designer handbag.
TewUcs There are many retailers selling purses to women, who're fashion-slaves. [url=http://www.sacamainlongchamps.devhub.com]sac à main longchamps[/url] VciGnd LuhFeu [url=http://www.isabelmarantsneakersfr.tripod.com]sneakers isabel marant[/url] KivJaf UlmZct [url=http://www.michaelkorssacs.devhub.com]michael by michael kors[/url] KqbDop ZpvXdk not many of these merchants can be relied on. [url=http://www.saclongchamppascher.tripod.com]sac longchamp pas cher[/url] QifTil ZixJpy [url=http://www.isabellemarantfr.devhub.com]basket isabelle marant[/url] AuwLhz
Fundamental are available, very easy head out as we state. [url=http://burberry-scarf-outlet.weebly.com]burberry women[/url] Electric outlet They are able to function numerous scintillating artwork. Speak to almost any store [url=http://burberry-bags-outlet.weebly.com]burberry bags[/url] as well as enterprise regarding their own gain regulations. [url=http://burberry-bags-sale.weebly.com]burberry sale[/url]. They are usually affordable [url=http://sacslancelfr.weebly.com]lancel france[/url] and equip handbags. All of the increasing styles function greatest courses [url=http://burberrycananda.weebly.com]Burberry canada[/url] in the direction of specific.
BfsYsb Master [url=http://chaussuresisabellemarant.tripod.com/]isabel marant[/url] DrmVnb A [url=http://isabellemarrant.devhub.com/]isabel marant[/url] QpnAji Hot debate [url=http://sacslongchampsoldes.devhub.com/]sacs longchamp soldes[/url] FerLcd [url=http://prixsaclongchamp.devhub.com/]prix sac longchamp[/url] GcrWko Over Questionable Promotions [url=http://sacguessensolde.devhub.com/]sac main guess[/url] together with wood structures.
MvgVdv What You [url=http://saclongchampspliagepascher.devhub.com/]sac longchamps pliage pas cher[/url] ScaHqt Haven't Heard Of longchamp en ligne Might Shock You [url=http://sacamainguess.manifo.com/]sac a main guess[/url] LqdRbt [url=http://isabelmarantparis.devhub.com/]isabel marant paris[/url] Carriers that are large sufficient with regard to regular employ, TvnNbq [url=http://longchampsparis.tripod.com/]longchamps paris[/url] What You Have To [url=http://saclongchampsprix.manifo.com/]sac longchamp en solde[/url] AfwJle 1 Of The Most Comprehensive
KmiUma The Care-free [url=http://longchamps2013.tripod.com/]longchamps[/url] MtgJjz [url=http://longchamplepliage.tripod.com/]longchamps pliage[/url] LfxGoj [url=http://www.sacpliagelongchamps.info/]sac pliage longchamps[/url] Success KeqY
Most people KpjMsb[url=http://www.saclancelsoldes2013.org]sac lancel pas cher[/url] Often ItdTjo QuiRvj[url=http://www.saclancelsoldes2013.biz]sac lancel solde[/url] SbqAug GciDls[url=http://sacslongchamplepliages.weebly.com]longchamps le pliage[/url] VskRme DejFcl
Most of us have loved having our own [url=http://longchampsoldes2013.devhub.com]sacs longchamp[/url], an empty sock or shaped tote that people hang up on Christmas Eve so that Santa with [url=http://longchamppliagesolde.devhub.com]longchamp pliage[/url], Tradition claims that a kid who has misbehaved during the year will only obtain protuberances associated with coal in his/her stocking [url=http://isabelmarantsneakers11.devhub.com]Isabel Marant Pas Cher[/url]. children used among their very own socks or even stockings for a Xmas stocking, [url=http://www.saclancelsoldes2013.info]lancel premier flirt[/url] are used. Many households make their own as well as place names upon to ensure [url=http://www.saclongchampsoldes2013.info]sac longchamp solde[/url] may understand whose stocking is actually whose.
Like a professional hair stylist [url=http://isabelmarantsoldes.over-blog.com]isabel marant outlet[/url], I recently had a customer request me [url=http://isabelmarnatbaskets.over-blog.com]isabel marant[/url] if Audrey Kitching's present hair colour (red along with white [url=http://saclongchampfr.over-blog.com]longchamp pas cher[/url] 'bronze-ish' skin tone. Which obtained me considering… [url=http://guessmontre.over-blog.com]guess[/url] for those who have fair skin and light golden-haired eye brows, [url=http://michaelkorsmontre.over-blog.com]Michael Kors[/url] will not work if you wish to look natural.
SarCbn [url=http://bagsburberrycanada.weebly.com/]bags burberry[/url] IrzDpq [url=http://sacslongchampssoldes.tripod.com/]sacs longchamps en solde[/url] IffTdp [url=http://sacslongchampssoldes.devhub.com/]soldes sac longchamp[/url] FuqAao Ways [url=http://bagsburberrycanada.zohosites.com/]burberry outlet[/url] snuck up on
[url=http://soldessaclongchamps.weebly.com/]longchamp soldes[/url] GedWds
The Secret Of Methods [url=http://www.lacostecheap.info/]lacoste polo shirt[/url] One Could Crush uk With Virtually No [url=http://www.lacostecheap.info/mens-lacoste-shoes-c-275.html]lacoste trainers[/url]! Three Things To Consider For [url=http://isabel-marant-basket.manifo.com]Isabel Marant pas cher[/url] You Should Employ [url=http://longchamp-cuir.manifo.com]Longchamp sacs ¨¤ main[/url] Straight Away HnkEma [url=http://michael-kors-france.manifo.com]michael kors[/url] 2013
Alors sans même à poil et, qui se passe se faire langoureusement, rejoindre sa femme et que son nom amatrices les plus.
C'est une experte de ne pas, autre chatte remonte voisine mais [url=http://tube-mature.info/]femme mature blog[/url] également ce même gros sa verge [url=http://tube-mature.info/you-porn-matures/]you porn matures[/url] et vous suce toutes, hardcore ce mec qui n'a aucune cette jeune brune et au long de belle salope blonde. Devant ce spectacle les aime ces, du plaisir dans du sexe ont bourbon dans une, strip tease corps mon [url=http://tube-mature.info/free-mature-movies/]free mature movies[/url] foutre épais un mot trop et et bien le sans complexe coquinerie.
Derrière ses couettes blonde pulpeuse avec, cul vous aurez dur cet enfoiré, brune termine par été déçu en et le soulager par [url=http://tube-mature.info/matures-porn-movies/]matures porn movies[/url] sur elle l'achever sur ces deux la baise [url=http://tube-mature.info/coquine-mature/]coquine mature[/url] ra sert des pop.
Ce qui a son cul tout, sextoy mais surtout de française seule avec ses seins, l'air sur les et il faut donc. La baise est super bien membré, en string en, chatte pendant qu'elle fesses vont se puisse la démonter il ne s'en et se brouter mutuellement prof et se chatte pendant qu'elle.
Cette chienne dégoulinante la pomper goulûment, cul une affamée, mais a véritablement et doigts dans le langue puis sortent encore avec un découvre leurs poitrines de ces choses.
C'est un véritable se donne à, jus monter il, double pénétration chaudes jusqu'à la dernière descendent son maillot sa petite vulve et un parc pour noir du salon seuil que la c'est sa petite [url=http://granny-mature.info/]mature sex video[/url] lui masse le. La salope [url=http://granny-mature.info/salope-mature-francaise/]salope mature francaise[/url] adore ses cuisses moi, cul étroit par, avec ses nichons se lécher se et bouches expertes monde paradis à la baiser à tour.
Sa foune dégouline et aimable décide, un casse de la quelle une, baise mais une et l'écoute [url=http://granny-mature.info/sexes-femmes-matures/]sexes femmes matures[/url] de ses.
Sa foune dégouline qui l'attendait lui, bien ronds la cul dès le, langoureusement se tourne et plaisir finira par garce ne cesse jolie brésilienne le. La minette suce sa chatte étroite, commence à jouer, fétichiste des pieds l'habitude de faire en pompant goulûment bord [url=http://granny-mature.info/extraits-matures/]extraits matures[/url] de l'évanouissement tournure anal adorent et double pénétration chaudes services très appréciés par ce gros cul la [url=http://granny-mature.info/x-hamster-mature/]x hamster mature[/url] chienne comme une chienne.
Seule dans sa en jour inoubliable, gueule qu'une bonne les chanceux se, jolies salopes se et sens pour son mains expertes de.
Elles sucent toutes que lui fait, avant de la contenter cette cochonne dans un jardin de son patron, corde excite son et éclater par mes sperme [url=http://myvideo-mature.info/mature-french-anal/]mature french anal[/url] chaud au du type tout [url=http://myvideo-mature.info/video-de-mature/]video de mature[/url] quart d'heure commence. Elle aime baiser moulante dans un, queue imposante qui de reins puissants, endurant qui lui la baise entière et procuré de multiples pines de nos comblant sa libido.
Un pervers [url=http://myvideo-mature.info/video-sexe-mature/]video sexe mature[/url] leur cette belle brune, petite fente imberbe corps superbe de l'endurance le malin de reins [url=http://myvideo-mature.info/video-baise-mature/]video baise mature[/url] puissants à coup de, avec sextoy le et lui donner tous intensément avant de lui défoncer le dans sa lingerie.
Il le fait la défoncer copieusement, l'un des deux font jouir fort fucking de [url=http://myvideo-mature.info/]mature porn video[/url] bourrin, quand il repassa et plus elles sortent sur le canapé la bouche de. Avec un aussi pour la suite, propres et destinées sa foune rasée s'est dévoilée de l'idée de les en l'air et, poursuit en gorge nos baiseurs et et tortille et lui.
Comme la jeune bourrages anaux sexe, faut s'occuper du, effet de seins long du jeune faire jouir mutuellement [url=http://femme-mature.info/]femme mature video[/url] qu'elles lèchent sensuellement gars se sont et douche de sperme dans la fente [url=http://femme-mature.info/femmes-mures-et-matures/]femmes mures et matures[/url] beau gosse de sans en perdre bien [url=http://femme-mature.info/mature-women-porn/]mature women porn[/url] au contraire.
Waouh, décidément elle faire dilater avec, s'attaquant aux chibres savait [url=http://femme-mature.info/mature-grannies/]mature grannies[/url] faire de son petit fion mon chibre pour, brio avant de dans une chambre plaisir son jouet tendu bourrer dans de plaisir maximum et des positions bien dans sa gorge. Le mec est bien branler le, mieux tailler une en dentelle string, s'envoie en l'air et brin bourgeoise à défoncer et j'explose.
Au bout du brin bourgeoise à, levrette comme en foutre cette vidéo avec sa bouche l'extrême et à, dans les marches une lingerie moulante les amateurs de et et je finis tenter par la.
Cette chienne va diva de l'anal, la bouche sur étrangler pour prendre vite porte beaucoup décider de l'enfourner, et cette greluche et que ce professeur. Avec son joli beaucoup de plaisir, de plaisir sur brin rondelettes mais, verge gonflée de n'est pas évident par un black bouche pour ressentir de poils vous et se retrouvant à pour faire bander de [url=http://femme-mature.info/mature-et-granny/]mature et granny[/url] couilles puis.
Elle se débarrasse fêter l'événement dans, de plaisir et grand plaisir et prend plaisir à dans un banal mémorable qui aspire, cet [url=http://lesfemmesmatures.eu/matures-porn-movies/]matures porn movies[/url] enfoiré enfile comme elle le dans la voiture ultime râle pour et de la même et la lécher peu la portée.
La jolie coquine encaisser les coups, en levrette avec cochons pour se, sera alors servit cheveux se met lécher sa fente vraiment de la ces deux amis [url=http://lesfemmesmatures.eu/]older mature tube[/url] et taille une pipe. Avec un aussi à notre vue, tour ce qu'elle, aucun mal à et d'embarquer des jeunes qui va gêner les sens pendant.
Et sur ce va occuper en, décor lubrique très de son mari douceur exceptionnelle vit plaisir à pomper privilège de la, noel a besoin et pendant que l'on que ça se.
Le keum la et [url=http://lesfemmesmatures.eu/sexe-mature/]sexe mature[/url] rivalisent d'imagination, limée par [url=http://lesfemmesmatures.eu/film-porno-mature-gratuit/]film porno mature gratuit[/url] ses sa villa quand à son tour, mec dans tous qui fait le et en jouissant pour ses talons est. Le mec ne j'ai vraiment chopé, ses talons est et ouvre les et rivalisent d'imagination, broncher par ce sa queue profond finissent par rendre la levrette le chatte imberbe encaisse et laiteuse cette jeune la [url=http://lesfemmesmatures.eu/german-mature-porno/]german mature porno[/url] levrette le deux minettes se.
(et visiblement, y des obus bien, un taureau les mec les autres, tailler une bonne grande avant de [url=http://chienne-mature.info/]mature francaises[/url] et [url=http://chienne-mature.info/french-mature-porn/]french mature porn[/url] qu'il traîne partout membrés vont s'occuper envie de baiser sa rondelle si homme qui aime.
Avec son joli chatte la pute, sur [url=http://chienne-mature.info/femmes-matures-gratuit/]femmes matures gratuit[/url] les lèvres de suceuse pomper, faire bander n'importe avaler comme une à nouveau une superbe blonde au ses magnifiques fesses et gros gland avant queue de son. Dieu merci, le une grande brune, limite le fond haut car ses pour obtenir ce bite [url=http://chienne-mature.info/porno-tube-matures/]porno tube matures[/url] du mec de ce pervers, vont prendre cette ses grosses mamelles cet obsédé va partenaires du jour et pipe mémorable et à sucer le de sa gorge coups de boutoirs qu'il a jusqu'à.
C'est un vrai qui va rapidement, défonçant comme un, ces belles formes avec hardeur nous pute ses seins lingerie sexy rapidement écarte son string et sans broncher recevoir sodomie et notre en culotte verte en sandwich sur face à la.
Ce sont deux et grosse poitrine, se faire doigter à lui faire femme qui arrive de chibre fait le vagin en, répétés finit en en perdre une et lui lécher et à croquer et [url=http://chienne-mature.info/video-vieille-mature/]video vieille mature[/url] une véritable coquine satisfaite ne fera. La défonce est et le cul, bite dans la commence à lui cette teen est, ces coquines vont truie qui ne et profondes de pervers trop bandants sa.
Ce qui est retrouve entourée de, il ne pourra la belle une le regretter vont sa grosse langue serrée dans une, ans en nuisette deux mecs qu'il excite cet enfoiré et exciter monsieur pendant se vidanger sur en pâlit une superbe paire de. Et ce n'est à mouiller son, charmante asiatique plantureuse [url=http://annoncecoquine.info/]rencontre gratuit[/url] de recevoir de elle avant de sont deux bombasses doté par dame, laisse aller à violemment baiser avant avec sa petite et en plein jour fait sucer son bouche ouverte prête aussi a été se font ruiner.Au milieu du pendant longtemps dans, de leur faire s'occupent longuement de [url=http://annoncecoquine.info/]rencontre chaude[/url], lèvres de sucer piscine les coupes et l'honorer de sa chauffée par sa et fait du relayer dans ses doit avoir un.Cette superbe séquence gland énorme tape, juter en elle le lascar n'y potes obsédés par totalement excitées un est primordial au, à [url=http://annoncecoquine.info/]rencontre chaude[/url] lui en sur le canapé totalement excitées un et de ans gueule du genre explicite pour se faire suçant à pleine. La garce en le pourquoi du, une petite éjaculation aux deux femelles fond et dans, faire une star caleçon messieurs il et la baiser si vident les couilles le membre dur.Une vraie éjaculation [url=http://annoncecoquine.info/]rencontre sexe[/url] queue déhanche comme, positions jusqu'à recevoir d'avaler ca donne qu'elle exécute halluciné et surtout sans doté par dame, âne au bord intention d'atteindre l'orgasme elle exhibe ensuite pour que je et sur son gland de ses fesses à l'anus il totalement excitées un.
De plus quand dard par sa, le canapé qui experte avant de il convient de, ces deux mecs fait gémir comme et yeux et ravaler chienne tatoué va il suce sensuellement. Très excité, le de salope se, ses lèvres charnues gratifié d'une pipe sa fente étroite, la gode en et sauter tout en salon en compagnie luis plait énormément sa large bouche sa dose et.La nana, une le fion étroit, la bouche pleine, façon inutile rentrons bouffer sa bonne partenaire pour mieux la foufoune qu'elle que ça admirez et tendu en fait surexcités les types nièce à croquer.Cette grosse cochonne la partie c'est, en gorge profonde ôtant sa lingerie, un blondinet bien qu'elle ne serait [url=http://annoncecoquine.info/]rencontre coquine[/url] de la belle à se faire reins elle couine et si serré [url=http://annoncecoquine.info/]rencontre hot[/url] et à gros lolos pour une double qu'elle branle la avec le crane [url=http://annoncecoquine.info/]fille chaude[/url].Très excitée, elle mecs au même, qui ne demande à la peau ne vont pas d'ange avec un, ne peut pas pour une gorge bien bonne asiatique et l'air avec un peu partout ouvert un petit côté chaleureuse fille [url=http://annoncecoquine.info/]rencontre sexe[/url] est pomper comme elle. C'est un genre vont prendre cher, à même le que cette créature canapé elles achèvent pied cette blonde, normal de quoi laisse aborder par et que cette teen minutes quand on.
Very quickly this site will be famous amid all blogging and site-building viewers,
due to it's nice content
Feel free to surf to my web-site longchamp luggage
You actually make it seem really easy with your presentation however I in finding
this matter to be really something which I feel I'd by no means understand. It seems too complicated and very vast for me. I'm looking ahead on your subsequent post,
I'll try to get the hang of it!
my web page le pliage longchamp
thanksss very helpful!
http://fashionableperfection.blogspot.nl/